Download this tutorial for printing.
More Tutorials from Fine Folly -
Click
Here
Devardi Glass And The Hothead Torch
.•:*:•. Tutorial Series .•:*:•.
… HOW TO MAKE ROUND BEADS …
Using A Bead Roller
TUTORIAL OVERVIEW…
In this tutorial you will learn to make round beads using Devardi glass, a tool
and a Graphite
Bead Roller. A Graphite Bead Roller is very useful for shaping stiff glass and
to help your
bead come to round sooner. The longer the glass is in the flame the more stress
that is
placed on it, so a method that shapes glass effectively and with the least
amount of time
and effort is of value.
In some cases we need to shape a particular glass without bringing it to a
molten state
because of impending devit if it is overheated. The other thing to realize is
that as Devardi
glass gets close to devit stage in the flame it often starts to get stiff. As a
side note, with
some of these glass types you can end up with an interesting matt finish when it
has
reached the devit stage. If you push it beyond devit, sometimes it results in a
slick finish
again…
you just have to experiment.
Within the same glass type (Opaque, Semi Opaque and Transparent) you will find
some
works stiff in the flame and some melts easily. This tutorial will teach you to
make round
beads with both types of glass. Actually, I find it quicker to use a Bead Roller
for soft glass
too, because it leaves me more time to decorate and puts less heat stress on the
glass.
Getting your first Graphite Bead Roller can be a bit expensive, but it’s worth
it in the time
and frustration it can save you. They come in nearly endless shapes too.
Because of these considerations I have turned more to the Japanese style of
shaping beads
than the American way. The Japanese will use a tool right from the start,
shaping and
rounding and cooling in the process. If you get the chance, be sure to watch a
Japanese
lampworking video. It can be eye opening to see a different way of handling
glass.
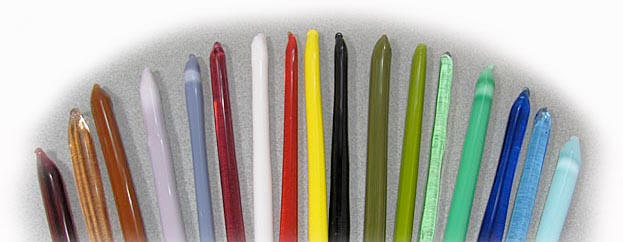
Let’s talk briefly about Devardi glass in general before we begin.
Devardi offers a huge
array of colors at fabulous prices. You get intense, color saturated glass that
is hand-pulled.
The hand-pulling means that rods will come in many thicknesses, some to thick to
use
directly on a mandrel.
When you want to use a thick rod, thoroughly preheat the end of it in your Rod
Warmer and
then pull thick stringer (to use like a thin rod). We offer a Tutorial on
pulling stringer if you
need to learn how, and it’s not hard once you get the knack.
If you don’t want to pull your own stringer, then buying ready-made Devardi
Stringer is a
great option. And if you don’t have a Rod Warmer, buying your glass as stringer
instead
of rods is REALLY a good option, because it will keep you from dealing with
shock and
shattering.
Some colors will hold their coiled-on shape on the mandrel no matter how long
you heat
them in the flame. In fact it can stay put until you bring it to a state of
devit and then to
blistering in the flame. This makes using a tool and a Graphite Roller an
important part of
working it. It also makes for promising sculptural use, but that’s a Tutorial
for another day…
So getting back to the subject…
when you wind a stiff variety on the mandrel and heat it, it
will glow but not merge, so you should use a flat tool to touch and gently press
the coils
together and shape the edges into round, and then use a Graphite Bead Roller for
the final
shaping. After I harangue you on the importance of a Rod Warmer, the following
two pages
offer some soft and stiff glass ‘theory’ that will go into more detail on
shaping before we
begin the actual tutorial.
And on the subject of devit, page 16 of this Tutorial has some neat
information on
preventing devit using Clear Frit Powder as a thin encasing layer.
.•:*:•. ON THE IMPORTANCE OF A ROD WARMER .•:*:•.
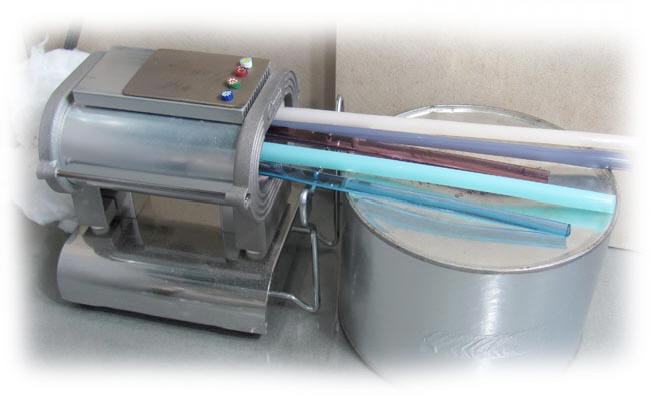
Using a Rod Warmer to preheat Devardi glass rods makes all the difference in the
world in
preparing them for the flame, so if you don’t have one, I STRONGLY encourage you
to get
a Rod Warmer. They are not that expensive and they are available from Devardi or
can be
purchased online from Beauty Supply sites (they are called Ceramic Heater
Stoves).
A Rod Warmer reaches 800-900 degrees, so you will rarely ever experience shock
or
shattering if you use one. Some people use a small Teflon coated Grill or
Hotplate
successfully by spending the extra time to make sure the rod is heated slowly in
the flame at
the start, but these don’t come near the temperature of a Rod Warmer.
You can take the time to wave and roll your cold rod in the high, back-end of
the flame to
warm it, and then ever-so-slowly bring it forward, rolling and heating it until
you can bring it
into the actual working area of the flame, but most people don’t have the time
or the
patience to do this successfully on each rod. And it’s really not cost effective
to spend your
time this way either. Even after doing this some people still experience shock
or shattering,
despite their best efforts to adequately pre-warm rods.
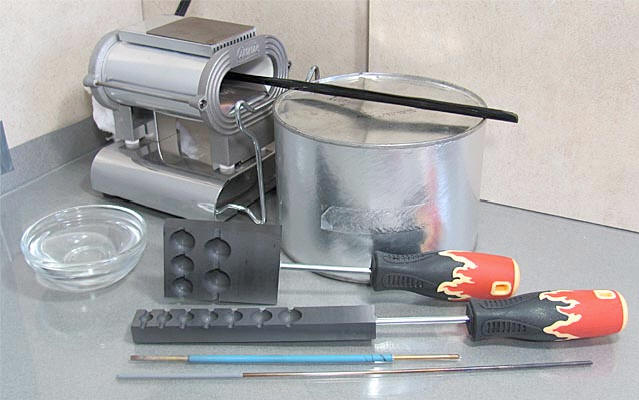
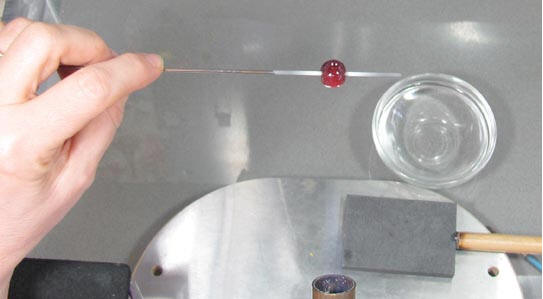
About my set-up…
As you can see in the picture above, I use a medium-sized nut can
(from Walmart) turned upside down to rest the ends of the rods on. It is just
the right height
and width. The Rod Warmer gets very hot, so I wrap a piece of Fiber Blanket
around the
cord at the back to act as a heat shield between the Rod Warmer and the cord
because I
have the Rod Warmer in the back corner of my worktable. Ceramic tile is behind
it.
Devardi offers an inexpensive steel plate for the inside bottom of the Rod
Warmer. It will
protect the bottom from glass rods that get put back in the Rod Warmer to hot.
They can
stick to the ceramic bottom and sides if you touch them together in a molten
state, so be
sure to roll your rod and cool it before returning it to the Rod Warmer. The top
of the Rod
Warmer makes a great surface to preheat Murrini on before applying them. I have
the
Murrini sitting on a small piece of steel plate, also available from Devardi.
To work Devardi glass with the greatest ease and productivity put your
rods in the Rod
Warmer about 2” to 3” deep. You only want to preheat the rod end, so that you
can hold it
normally and work it in the flame. When you first turn on your Rod Warmer plan
to preheat
your rod(s) for 5 to 10 minutes before you use them. Then, after each use, roll
the tip of the
rod on your marver to shape and cool it before you return it to the Rod Warmer.
A glowing
rod end will stick to the Rod Warmer and to other rods. Keep returning the rod
to the Rod
Warmer so that it is ready for the next use. Cool rods can be put into a hot Rod
Warmer
without shock, and used once they are fully warmed (about 5 minutes on average).
.•:*:•. Time Out For Some Theory .•:*:•.
On Working With The SOFT Variety Of Devardi Glass
One definition of “ Theory” is …a well-substantiated explanation
of some aspect of the natural world…”
If you haven’t made a round bead before, I would encourage you to stop now and
read the
steps to the tutorial and then come back and read this. It will make more sense
then. So
let’s discuss the theory of shaping a bead when using soft Devardi glass.
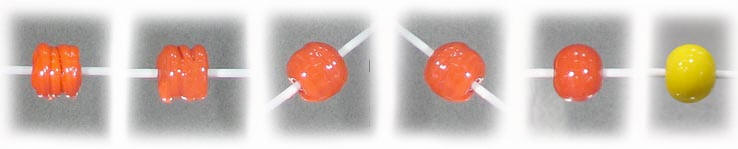
After you have wrapped your barrel (see the picture on the far left above) it’s
time to shape
it round using the flame and your tools as needed.
Soft glass will begin to melt, merge and shape easily in the flame. You can use
your
Graphite Bead Roller right away to form an accurate and consistent shape once
you have
the basic barrel prepared.
As you then decorate your bead, you want to keep the core solid and heat the
surface.
After applying your decoration you can hold the bead below the flame and let the
stream of
heat flow over the top of the bead as you roll your mandrel.
In this way the core can remain fairly solid and hold it’s shape, and the
surface is what gets
softened and smoothed. This is how you melt in details and dots without causing
your bead
to shift and lose round shape. You can also heat one side and then when finished
heat the
other side, so that the side that is NOT being worked helps hold the final
shape.
.•:*:•. Time Out For Some Theory .•:*:•.
On The STIFF Variety of Devardi Glass and Shaping It With Tools

Another definition of “ Theory” …A set of statements or principles
devised to explain a group of facts or phenomena, especially one that
has been repeatedly tested or is widely accepted…”
I want to suggest a simple method to shape stiff glass in the flame in the least
amount of
time, and with the least amount of heat stress on the glass. This method departs
from the
common ‘theory’ of making round beads, and includes pressing and shaping with a
tool, and
then using a Graphite Bead Roller to mold and true up the round shape.
The same ‘rounding’ tendencies hold true for stiff glass as for soft, but on a
lesser scale.
The first difference in working stiff glass is that when you wrap your barrel
shape to begin a
bead you don’t wait for the rounding in the flame. Just jump in and start
shaping with your
tools. It will leave you more time to decorate and save you the frustration of
working and
reworking in the flame to get the shape you want. It will also assist in
producing consistent
sizes of beads more easily, such as in making matched sets. And we can all use
more time
for the decorating and designing end of lampworking.
As soon as I have a barrel wound, I prefer a brass tool for shaping because it
can be used
to scoot glass over and touch gaps together easily, and this helps stiff glass
merge quicker.
I also like graphite as a tool because it will smooth rough glass without
sticking (just keep
taking it out of the flame as you work so that you don’t get the graphite so hot
it starts to
stick to the glass). If you buy a graphite rod to sharpen and use, be sure to
set it in a heat-
shielding base to hold it with. Graphite transmits heat right now!
Regardless of what you use, when you touch stiff glass with your tool in the
flame it begins
to flatten and merge, and this is useful to remember and get comfortable with.
And when
you learn to use Graphite Bead Rollers you achieve the shape you want in the
least amount
of time. It’s a win-win situation!
.•:*:•. HOW TO MAKE A ROUND BEAD .•:*:•.
Using A Bead Roller
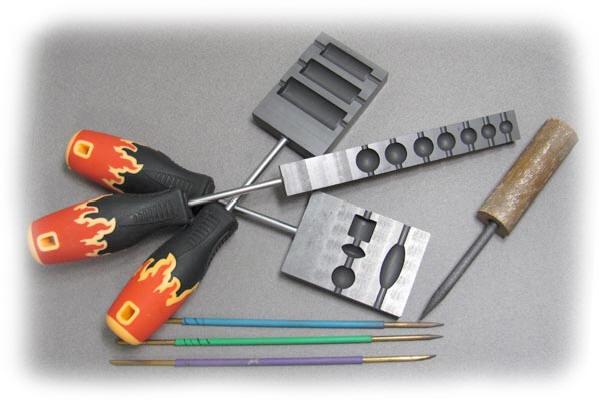
WHAT YOU NEED TO BEGIN…
Rod Warmer
Hothead Torch
Mandrel dipped in Bead Release
Brass Tool (or shaping tool of your choice)
Cooling Rack and Marver
Rod or thick Stringer of D165-Opaque High Density Black
Bowl of Distilled Water (Distilled Water helps keep minerals from building up on
your tools)
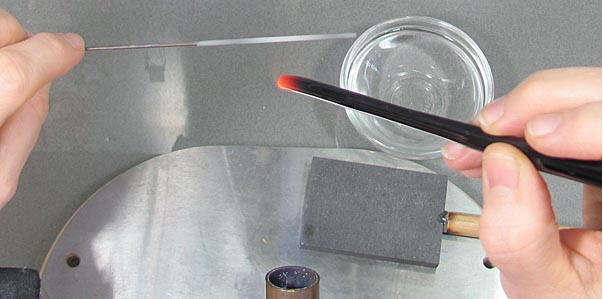
STEP 1. Light your torch and let it warm up a bit. Then adjust it to the
lowest flame
possible. You want your Hothead torch set to the lowest flame it can be without
going out.
You should be able to hold your hands (and work) 2” to 3” from the sides of the
flame when
it is set low enough. As you read through the steps notice how far the rod is
from the torch
head in the pictures. It is about 4” from the torch head to the rod tip in this
first picture.
Spend time rolling and heating the coated end of your mandrel from end to end.
This will
prepare it for the glass and will help prevent air bubbles from developing from
the gas of
uncured/inadequately dried bead release.
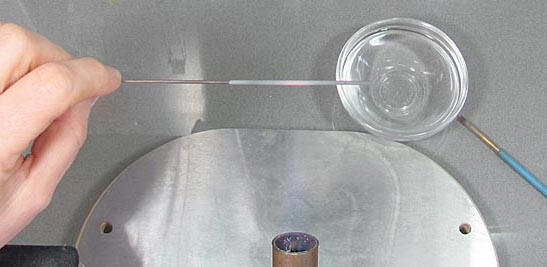
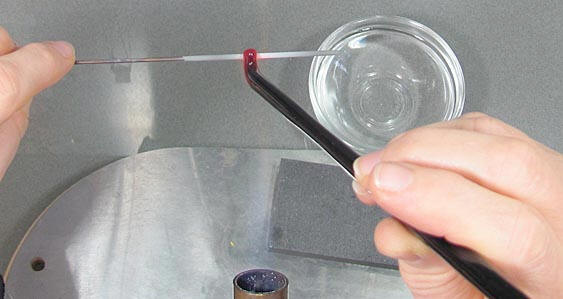
STEP 2. Next, take the pre-warmed rod from the Rod Warmer and dab 2” to
3” of the end in
and out of the flame -about 4” to 5” above the torch. Point the rod end forward
(away from
you) and dab it in and out of the flame a few times to be sure it is fully
pre-warmed. Then
begin to roll about 1” of the tip in the flame, still working about 4” from the
torch head. You’ll
see the sharp edges of the rod begin to soften and then glow when it’s ready to
be worked.
While you do this you should be holding the mandrel farther out in the flame to
keep it warm
as you bring the rod to a glow.
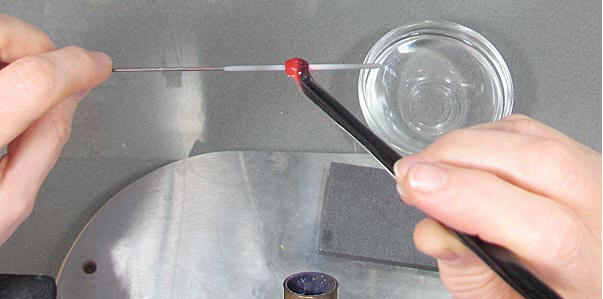
STEP 3. When the end of the rod is glowing, set the tip of it in the
center of your mandrel
and slowly roll the mandrel in the direction that is up and away from you. If
your mandrel is
hot enough it will stick and you can gently pull the glass a bit to stretch the
glass away from
the mandrel. This will give you a thinner length of glass to wrap around the
mandrel. If you
have difficulty using a rod to wrap with, use a stringer, making the same number
of coils and
doing the following steps.
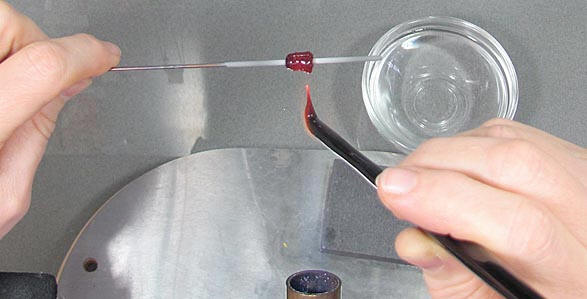
Wrap a complete ring around the mandrel before you start leaning to the right to
make your
next coil. You want to be careful with this first wrap and have it make a full,
even circle. If it
isn’t round and smooth around the mandrel you cannot fix it, and your bead hole
will not be
round. If this happens, flame cut the glass off and put your mandrel in a pot of
water or
wherever you put bad work/mandrels when the bead release breaks, and then start
again.
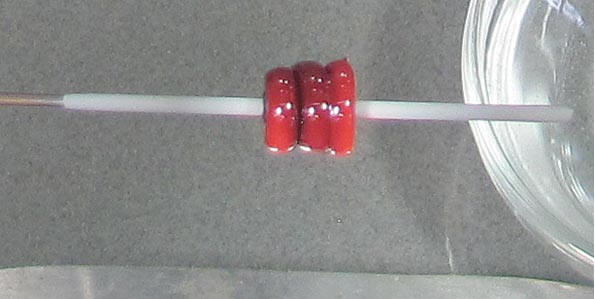
STEP 4. Continue to wrap with a gently stretched length of glass and move
to the right and
lay your next coil right along the first one. You want to keep the coils the
same thickness
as far as possible.
STEP 5. You are going to make 4 complete coils around the mandrel in this
way. On your
last coil, as you are almost finished with it, stretch the rod away to flame-cut
it. Stretch, roll
your mandrel and wrap the fine strand of glass as you do. In this way you won’t
form an
uneven or big ridge.
STEP 6. As you begin each coil take the time to reheat your rod end to a
soft glow for stiff
glass, or to a molten tip for softer glass like this, and then touch the molten
tip to the far left
side of the barrel and begin to coil again.
STEP 7. Wrap another layer in the same way from left to right. You will
make a total of 3
layers of coils in this way to form your barrel shape before rounding it into a
ball.
STEP 9. Just like before, at the end you need to stretch the glass to a
strand during the last
wrap to make a smooth round finish to the coil. Then flame-cut it off.
Make 3 complete wraps from left to right to create a barrel that is a bit wider
than it is tall.
And if your layers are thin, you may need a 4th row of coils to get a barrel
shape that is
slightly wider than it is square. This shape will give you the right amount of
glass to make a
round bead. If you wrap to tall you get a donut shape bead. If you wrap to wide
you get a
rounded barrel-shape bead, so pay attention to the final shape of your barrel.
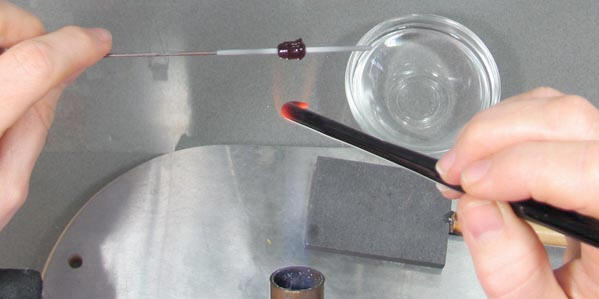
.•:*:•. If you find you have made coils with a large gap in between .•:*:•.
(like the gap between the left and middle coils above) go back and gently heat
and press
the gapped coils together with your tool to merge the coils. The reason to stop
and do this
is because you want to start each wrap on a fairly smooth base so that you don’t
trap air
bubbles. An air bubble can rise and pop open a hole on your bead, or just sit
there on the
surface, showing as a little bubble.
If an air bubble does occur later, heat the bubble to a glow and use sharp
tweezers to
delicately pinch under the bubble and stretch it off (like flame-cutting the
glass at the end of
a wrap) as you roll your mandrel. Then reshape the area you pinched the bubble
off of.
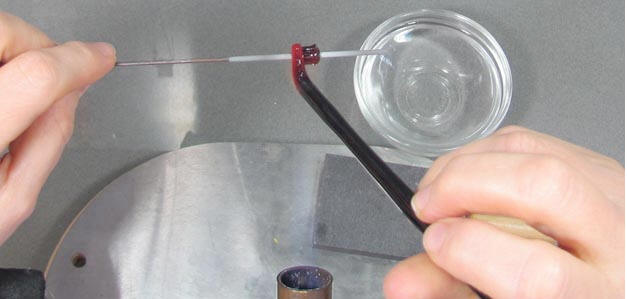
The next page shows the gap in the coils above being closed with a tool.
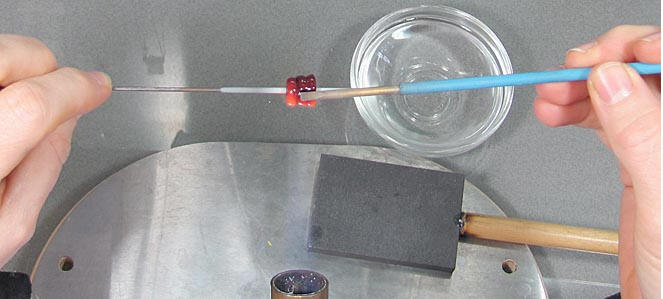
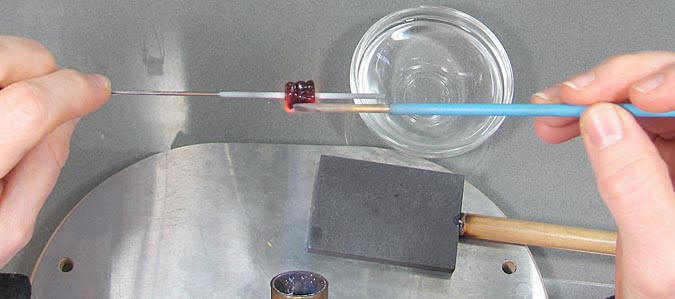
To close gaps, gently heat the coils and
use your tool to scoot them toward each other.
You want to bring the coils you are working on to a gentle glow and then touch
with your
tool over and over. Be sure to cool your tool repeatedly. The metal touching the
glass
helps the glass merge and smooth out. Your bead should be in and above the
flame, about
4” from the head of the torch.
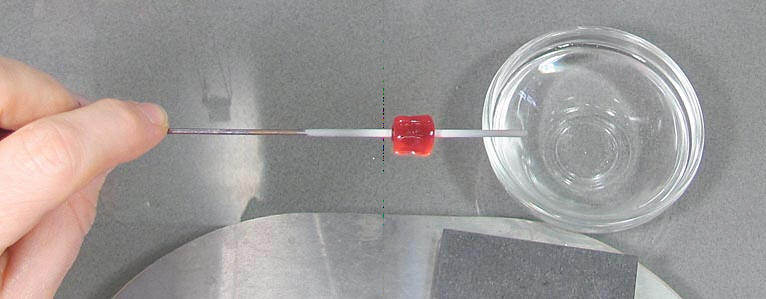
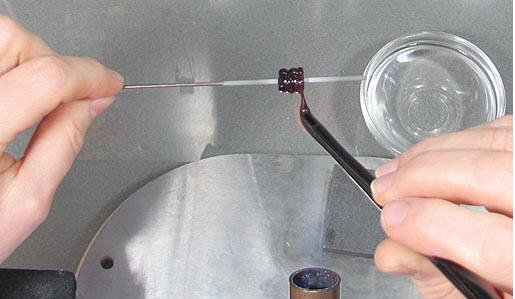
When your bead surface has been smoothed out you are ready to start the next
wrap. You
do not want to lose the barrel shape at this stage, so do not overwork it (or
overheat it and
start it rounding in the flame if it is softer glass). This picture shows the
bead starting to
glow and get to soft and wanting to round -but it still needs one more layer of
coils so it is to
soon to let it go round. Be aware and keep the barrel shape.
Now back to our tutorial steps…
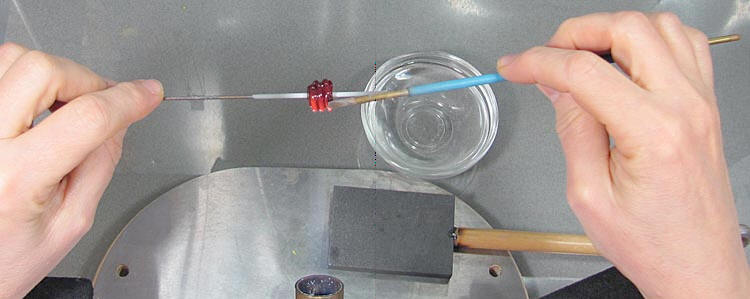
STEP 10. Once you have the barrel made, continue to turn your bead in the
flame and start
to use your flat tool to gently press the right rim of the barrel in toward the
center. This is to
help the side start to become round. Do this all the way around the bead. Don’t
press so
hard that you make a cone shape, just gently press the rim/edge smooth all the
way around.
STEP 11. Gently heat and press the middle coils into one another and then
angle your
mandrel and gently press the left rim all the way around the bead.
STEP 12. When your left and right rims are softly rounded and your middle
coils are
merged, you should look closely at the glass around the mandrel on both sides of
the bead.
If you have ridges circling the mandrel, gently heat and use your tool to make
them merge
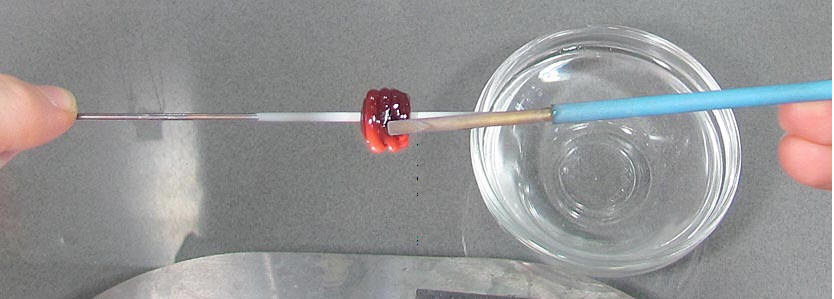
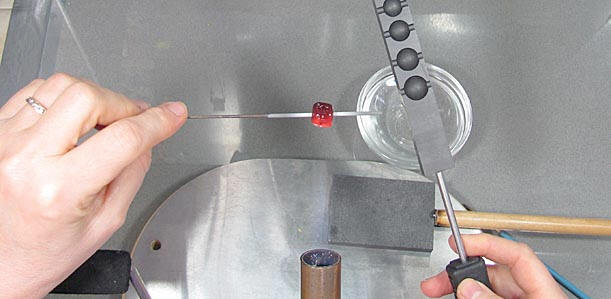
or disappear. Now you are ready to bring the bead to a glow and put it in the
Bead Roller.
.•:*:•. Time Out For Some Bead Roller Tips .•:*:•.
Graphite has a wonderful slick surface that molten glass glides on. Here are
some general
tips on using a Graphite Bead Roller.
To begin shaping, once your barrel has been rounded up using your tool and the
flame,
you heat the bead to lightly glowing and put it in the hole or cavity that is
just larger than the
bead. Very gently press it against the right side of the Bead Roller cavity to
begin rounding
on that side (and then repeat on the left side). Repeat as needed, but reheat
each time
before using the Bead Roller. After you get the sides in a rounded shape, reheat
and then
roll your bead gently against the bottom of the cavity to bring the center to a
round shape.
When the sides and the center have taken the rounded shape of the Bead Roller,
then I
reheat and gently roll the bottom-center of the bead one last time against the
bottom of the
Bead Roller for a final shaping.
If the bead is smaller than the cavity being used, you can heat and fit it in
stages into the
smaller cavity. When it is rounded it should have a slight clearance all the way
around in
the Bead Roller cavity, or you should use the next larger size hole.
If any given spot needs attention, first heat the side that needs attention,
leaving the other
side firmer so that the cooler side helps hold the round shape you have already
accomplished. Gently heat and press or roll the heated side to get the shape you
want.
When you are happy with the round shape, very gently reheat the entire bead,
rolling it and
slightly flame polishing it before you put it in your bead kiln (or whatever you
use at this
point) to cool the bead slowly – or you are ready to start decorating it!
The Bead Roller shown in this Tutorial is from CGbeads at
www.cgbeads.com but I
think
that Devardi is planning to offer them at some point. CGbeads has videos showing
how to
use the Bead Rollers, and they are worth watching if you plan to get one.
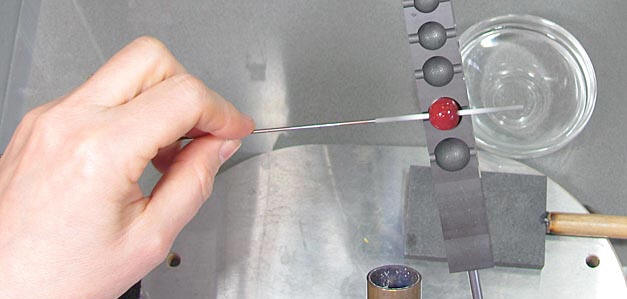
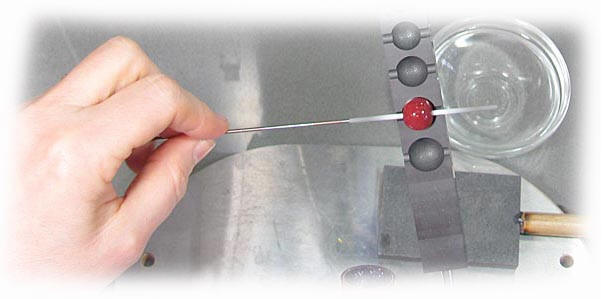
STEP 13. Heat and shape your bead in the Bead Roller as described on the
previous page.
STEP 14. When you are happy with your bead gently reheat it one last time
to slightly
flame polish it if needed, and then decorate it or put it in your Bead Kiln (or
whatever you
use to garage your beads).
Now give yourself a ‘round’ of
congratulations!
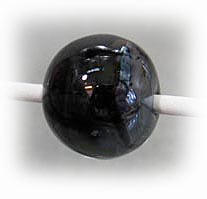
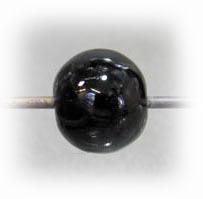
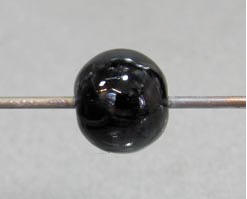
.•:*:•. Opaque High Density Black & Your Hothead Torch .•:*:•.
This has been a long Tutorial, but I want to add one last thing about working
with Opaque
High Density Black on your Hothead Torch. Sometimes you will end up with a
metallic
sheen on your black bead, as you can see in the picture on the top left side.
To remove this sheen, after your bead is annealed and cool, clean it with Tarnex
and then
wash the Tarnex off and dry it. This simple treatment is useful to know,
especially since
black is such a nice base color to work with.
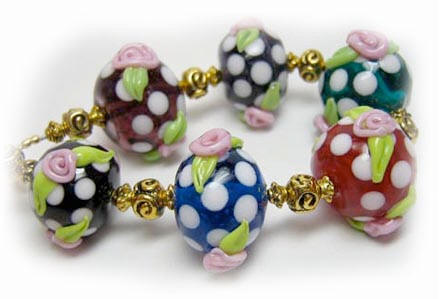
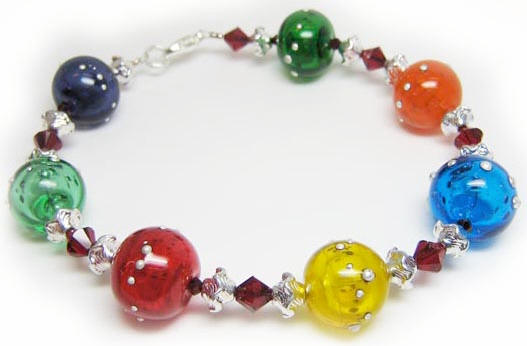
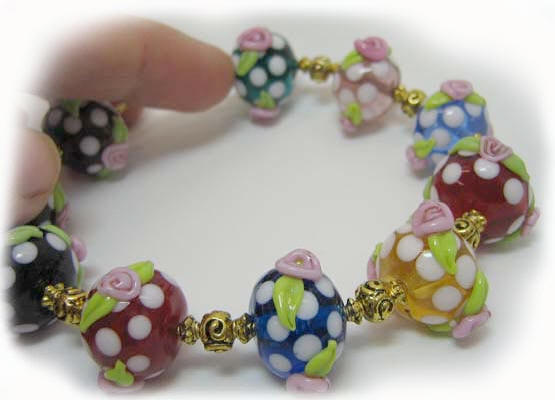
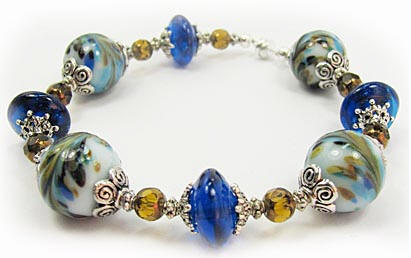
.•:*:•. Round Possibilities.•:*:•.
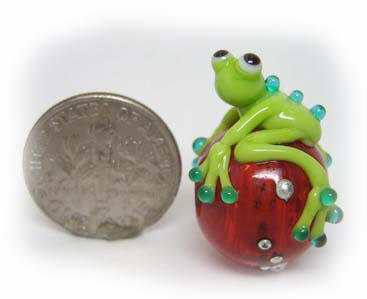
The froggie’s base bead was made with Transparent Cranberry. Sterling silver
wire was melted on
to make the silver dots on the surface of the bead, like the bracelet on the
first page.
Now that you can make round beads with consistency just think of all the designs
you can
make! You can use frit, draw designs on with stringer, make dots and create
combinations
of design that interest you…
the possibilities are truly endless.
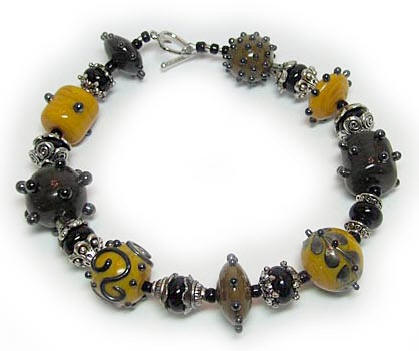
In closing, here are 3 bracelets decorated with frit, stringer work and dots. If
you like their
design feel free to make them up for yourself or to sell. Our tutorials always
allow you to
make and sell any item or pattern shown.
To assist you with frit, stringer and dot work, here are a few pointers (if you
need them).
And realize that there are many ways to work with these applications, so this is
just one
way. Remember to experiment with the colors and techniques that interest you
BEFORE
you jump into a full project. Some glass will hold up in the flame and some
won’t. Some will
fight with it’s neighbor and some works great together. Make test beads and
anneal them
before you create an entire project to avoid frustration and loss of labor and
glass.
To draw with stringer, gently preheat the working area on the bead
surface and the tip
of your stringer, and then set your stringer on the bead – holding it to the
right side of the
flame to begin.
You want to find the place beside the flame that causes your stringer to relax
just enough to
draw with it. Move closer to the flame until you feel the slight ‘give’ start
and then get busy
drawing! When you find this special ‘spot’ near or in the flame you should be
able to put
gentle pressure on the stringer to draw as you like (while it stays stiff in
your hand) yet
glides onto your bead at the tip – not to hot, not to cool!
|
|
|
The Stringer and Dot Bracelet was made using
Opaque Burnt Carrot Orange and both Medium and
Dark Brown for the beads, with Metallic Silvery Black
use for stringer and dot work.
|
|
To make dots, gently preheat the working area on the bead surface, and
then preheat
the tip of your stringer to form a tiny dot on it. Then set the dot on your bead
where you
want it, moving closer to the flame to cut it as you pull the stringer away.
Once you have
applied your dot(s) be sure to reheat the dots in the flame. Heat them enough to
‘seat’ them
on the bead so that they don’t pop off, or have undercut area that can get
hooked on
something.
If your glass stringer is to stiff to form a dot on it’s tip, then heat the tip
and set it on the bead
and flame cut as you pull. In this case, press the stringer to the bead to get
the size dot
base you want, and pull off slowly or quickly to leave the amount of glass you
want in the
dot. Put the dot right back in the flame to round it if you are using a stiff
glass.
You can go back and touch a cool dot with a hot stringer tip to add more glass
to the dot.
|
The Dot Bracelet was made by using
different Devardi transparent colors with effetre dots applied afterward. If
you want a creamy melt to your dots without tool work, Moretti/effetre melts
nicely across Devardi glass. |
|
| |
|
| |
|
|
 |
The Frit Bracelet was made using
Semi Opaque Lt. Baby Blue with a 96 COE frit that was melted on and then
raked. The bicone beads were made with Transparent Vibrant Blue.
Frit comes in different COE’s. Typically 96 COE frit is more vibrant in
color, but use it sparingly (use 10% or less compared to the size of your
bead). Devardi is 104 COE. |
| |
|
To use frit, make your bead and then
roll it in the frit of your choice. Put the frit in a large
spoon and hold it under the torch to set your hot bead in, or put it on your
mandrel and roll
your hot bead on it. You can use whatever method you like.
Once you have the amount of frit you want on the bead, press the frit flat with
your tool as
you gently heat it in the flame. Add a layer of clear powdered frit and melt it
in if the frit or
glass is prone to devit. To rake the frit, heat the bead to a gentle glow and
use your pick in
the flame to hook just the surface of the bead’s frit and roll your marver
slowly but steadily
away from you, raking the frit in the flame as you turn. When you have raked all
the way
around, lift the pic and stretch/flame-cut the glass that was hooked off. Put
your pic in cool
water to shatter off any glass that adhered. Gently flame-polish and shape the
bead.
|
 |
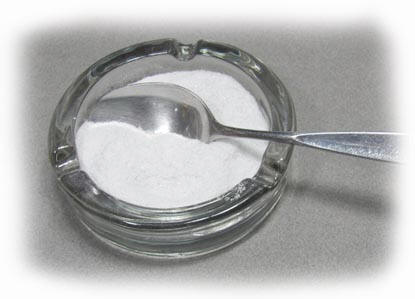 |
A Note On The Benefit Of Using Clear Frit Powder Between Layers…
Devardi glass likes to be worked cool in the flame. Some colors want to be
heated without
ever getting to molten stage, or they may devit. I have found that after shaping
the bead, if I
roll it in clear frit powder and then melt it in I can then work the color much
hotter in the
flame, and I can stack colors, adding a layer of the clear frit powder between
each stack if
needed. Experiment with this and see how you like it.
The bead below was made with this method. The base is Opaque High Density Black,
with
base dots of SOP Moonstone White, and then dot colors in Transparent Cranberry
and
Cobalt Blue, SOP Lemon Yellow and a Green. I had to press the dots flat and
shape them
because they tended to stiffness, applying clear frit powder with each new
layer.
Finally, I raked the edges of the dots toward a center point, and then used the
blunt end of a
clear stringer to twist them, and applied a dot of Opaque High Density Black on
top. Fun!
.•:*:•. About My Lampworking Set-up .•:*:•.
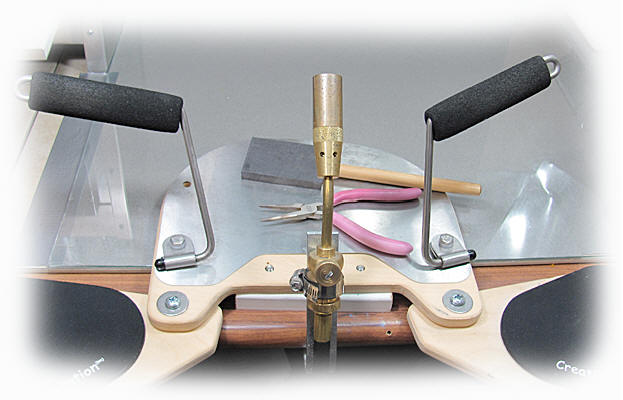
You might be interested to know what the black bars are in the tutorial
pictures. I use a
‘Creation Station’ for elbow and wrist rests. I find it makes all the difference
in keeping a
steady hand when applying fine detail.
I use bulk propane with my Hothead Torch. I have a long hose that goes through
the wall to
the 5-gallon propane tank. I am careful to thoroughly clear the gas out of the
hose after
each use of the torch. This has stopped the problems I originally had with
spitting and gunk
in the line.
Please note that I show the Hothead Torch in each picture so that you can refer
to the
location of it as you work (especially if you are having a problem with any
given step).
Realize that you are looking down at the torch, so you can’t see what is below
the flame and
what is in it. I try to state where to hold things when it is important to the
step.
These tutorials were made using a Hothead Torch, but any torch can be used.
If you
are on a surface or pre-mixed torch you will need to make adjustment for the
significant
difference in heat that it produces. For example, you will not be able to use
your tools
directly in the flame as you can on a Hothead Torch. You must work to the side
of the flame
with tools. A Hothead Torch is much cooler than other types of torches.
Please feel free to email me at FineFolly@bellsouth.net if you have questions. I
always like
to help if I can!

Annealing Bubbles versus a Fiber Blanket
or a Crockpot of Vermiculite
If you do not have a bead-annealing kiln to put your work in after you finish it
then you
probably use either Fiber Blanket or a crockpot full of Vermiculite, or what are
called
Annealing Bubbles.
I have used each one of them, and for the size beads I tend to make I found that
the
Annealing Bubbles were more effective at slowly cooling my beads. I used to wrap
my
crockpot in a fleece blanket while set on high to let my larger beads cool, and
then turn it off
after a few hours, but that is not recommended and can cause your crockpot to
overheat, as
you can see by the faded paint on the crockpot in the picture above!
But even the Annealing Bubbles are inadequate for all but smaller beads, when it
comes
right down to it. If you continue in lampworking you need an annealing kiln.
Devardi plans to offer a Rod-Warmer sized mini-kiln soon. Look for it as the
least expensive
option to anneal and cool beads. Another option you might like to know about is
The Glass
Hive. They allow you to put a kiln on layaway and take as long as you like to
pay it off, and
that is what I did. You can see their ‘Short Guy’ kiln in the picture above.
It’s a great little
kiln. The Glass Hive is online at
www.theglasshive.com if this interests you.
They
frequently have sales where they reduce the price or pay for the shipping.
To locate Annealing Bubbles, do a search for ‘Annealing Bubbles’ online and find
the best
price for them in the large Tin. They need to be in metal to work best and the
larger Tin lets
you put many beads in it during a work session at the torch. The supplier I got
them from is
www.artcoinc.com