|
|
|
|
|
| Download this tutorial for printing. |
.•:*:•. The Devardi Glass Tutorial Series .•:*:•.
by
Fine Folly Glassworks
MAKING BEADS
PART ONE
HOW TO GET STARTED
What You Need To Begin, Tutorials, Glass Discussion, Tips,
Workarea Set-up, Cooling & Annealing Info
 |
|
 |
INTRODUCTION…
If you have been bitten by the 'Lampwork Bug' please allow me to say “Welcome to the
family!” I trust you will find that this unique art form is a never-ending challenge and a
thrill. I can tell you from experience that whatever you bring to this art form YOU will be
what challenges you the most. The skills you develop, the types of work that interest
you… just wait and see. The directions you can go in are endless and the level of
involvement is up to you. This can be a fun hobby or it may become a passion that
rewards your effort with gorgeous work and high-dollar sales.
First off, I want to encourage you to take the time to read all the way through this
Overview, and then practice and learn the basic skills of Lampworking taught in the free
Tutorials on the Devardi website. Learning to make round beads with and without a
Bead Roller is critical, as is learning to pull Stringer and work with it. You can find these
Tutorials on the 'TUTORIALS' Drop-down Bar on the Devardi website.
I suggest you look for these Tutorials and print them out. This Overview is meant to be
used along with the Tutorials to get you started and well on your way in Lampworking. In
the next section I list the Tutorials offered on the Devardi website at the time this
Overview was created. I think you will see how using this Overview with these Tutorials
will get you going. Learning basic lampworking skills is a must and will serve you as
stepping-stones to build on. If you don’t learn them now you will limit your ability until you
do master them.
I have known of Lampworkers who skipped the first steps and got right into making showy
Focal Beads. Focal Beads are exciting to make and can be worked up in an irregular
shape, and sometimes can be sold. But when the Lampwork Artist needed to make a
matching set of beads they were unable to make them. And down the line some of
those Focal Beads cracked and came back to them with unhappy customers behind
them. So they had to go back and learn the foundational skills that they should have
learned at the start.
Don’t let that be you - learn your foundational skills and then the sky is the limit.
MY SET-UP…
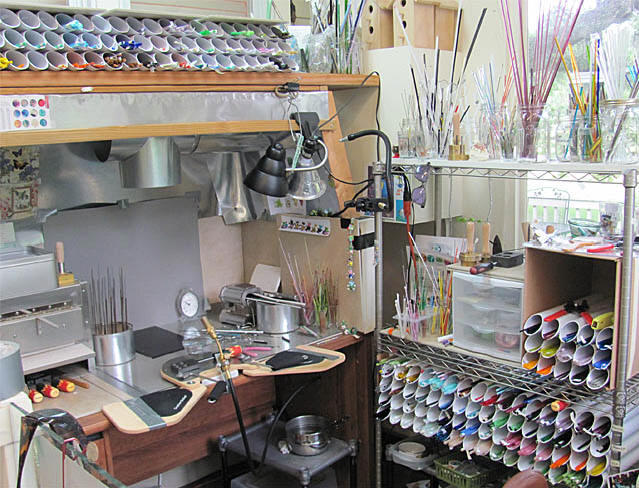
This is a picture of my workarea and my glass storage. I have set it up to have almost
everything within arms reach as I work. As you plan your workarea I hope the things I
write about give you food for thought. I remember wanting to see how other people set
up their workarea when I was just starting, so I will ramble about my set-up for a bit.
I use a Creation Station to support my hands and arms. My Hothead Torch is mounted to
the old Desk that I covered with Paver Tiles for fireproofing. The desktop has framed-in
sides and a roof of sorts, set on top of it and covered with thin metal. This is for
fireproofing and to support the Paver Tiles around the sides and to hang the vent system.
You can see the exhaust ducting above my torch. It goes out to the right and through
the wall. The exhaust fan is in the box mounted on the wall. I have a small window
behind my chair on the back wall that opens to allow fresh air to be drawn in and past
me as I work. If I were to do it all over again I would raise the roof higher, but I have had
no problems with the heat and the height it is at. If I switched to a surface mix torch I
would want it higher and deeper to the back wall though due to the increased heat
from that kind of torch.
My worksurface and surround are covered with large Paver Tiles. In this picture I happen
to have gray poster board up because I shoot Tutorials frequently, otherwise you would
only see the tan Paver Tiles.
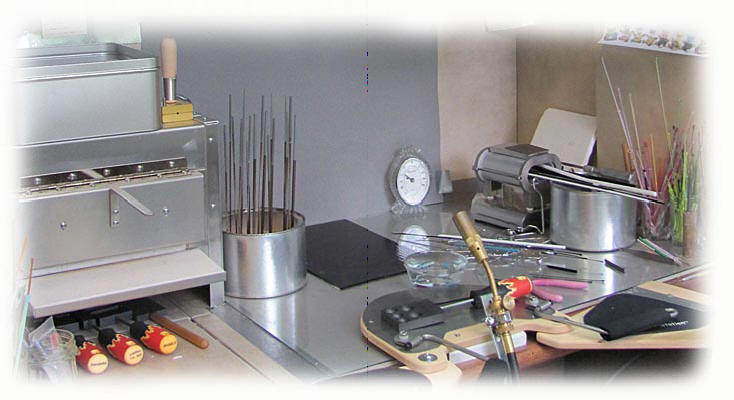
I have Japanese Annealing Bubbles in their tin box on top of my Annealing Kiln, and I
keep my Graphite Bead Rollers under my Kiln for their protection when they aren't in use.
In case you are curious as to why I have both a Kiln and the Annealing Bubbles, I use the
Annealing Bubbles for quick cooling test beads when I want to see how colors work
together. After about 10 minutes you can remove the bead from the Annealing Bubbles
and take a look.
My Rod Warmer is in the back right corner and it has a piece of fireproof Fiber Board (or
Kiln Shelf Board) to shield it's cord from heat since I have it close to the wall. I use a
medium sized nut can from Walmart, turned upside down, as a rod rest in front of the
Rod Warmer. It is just the right height coincidently, and helps support several rods at
once in the Rod Warmer. You can also see the pot of water underneath my worksurface
on a little stand (under the desk on the right side). It is a place to put hot, bad work that
needs to be put somewhere. When you are starting out this is very useful. And when
you are practicing wrapping round beads and make a bad start, just go ahead and
dunk it. Correcting a bad first wrap is very hard to do on a small bead.
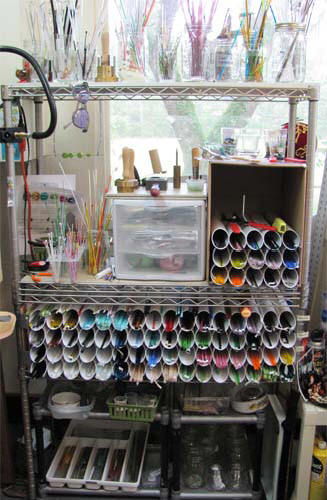
I use 2 inch wide PVC Pipe cut on the diagnal for storing individual colors of rods and
stringers. Cutting on the diagonal makes it easier to get the rods out. I store stringers in
the upright cardboard box on the shelf unit (and I need to cut more PVC tubes to store
more stringer). My Transparents and Semi-Opaques are stored in tubes on the shelf
below them. Above my torch area I keep my Opaque colors. On the top shelf I have
Mason jars to hold tall rods and other COE. COE stands for Coefficient Of Expansion,
and it relates to the expansion of the glass and what is compatible. Do not mix different
COE's, unless it is to use some stringer or murrini or frit. It should be less than 15% of the
bead content to get away with it, and sometimes it still will crack due to incompatibillity.
The lower the COE number the stiffer that glass generally is.
Frit, Pixie Dust and Murrini are kept in the little 3-drawer plastic unit and in small trays
underneath, and brass tools are lined up within arms reach. As you can see, I use a
metal shelf unit because it can hold the weight of glass and brass better.
I encourage you to think about your set-up and plan it. Even if you can't build it at the
moment it will make a difference to develop your ideas about it. Plan to have a place
for everything and consider the storage needs of your tools and glass. One can never
have too many tools or too much glass it seems!
WHAT YOU NEED TO BEGIN…
I am going to suggest a list of commonly used equipment, tools and some of my favorite
types of Devardi glass to get you up and going, but please feel free to substitute with
tools and items that interest you. You can see my worksurface above and my upright
unit for tools and glass storage below. The rods and stringers are being stored in 2 inch
wide PVC pipe that has been cut on the diagonal.
A LIST OF EQUIPMENT, TOOLS AND GLASS…
A Work Table That Has Been Fireproofed, A Hothead or Generic Torch & A Mounting
Bracket With Screws, An Approved Gas Hose And A 20 Lb (5 Gallon) Tank Of Propane
(Or No Gas Hose/5 Gallon Tank And Instead Use Small Bottles Of Mapp Gas)
A Good Ventilation System With A Source Of Fresh Air Behind You
A Rod Warmer (Ceramic Heater Stove) & A Rack To Set Hot Rods & Stringer On
Bead Cooling/Annealing Equipment (In Order Of Effectiveness From Least To Best):
Fiber Blanket
Vermiculite In A Crock Pot
Japanese Annealing Bubbles
Annealing Kiln
Mandrels & Bead Release
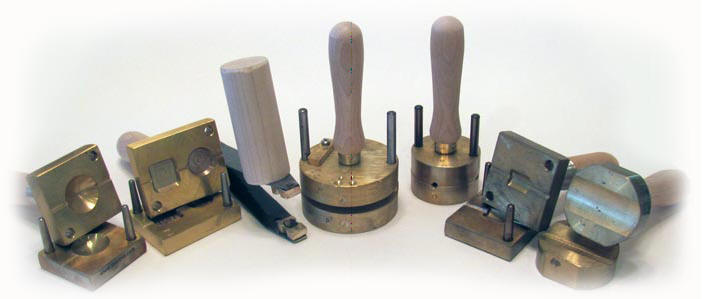
Basic Tools: A Graphite Marver, Long/Needle-Nose Pliers, A Flat-Edged Stainless Steel
or Brass Tool (For Shaping & Manipulating Glass), A Long Pair Of Tweezers (4 to 7 Inches
Long), A Steel Dental Pic Or Rake/Poker And A Sharpened Graphite Rod In A Holder
Of Some Kind (Because Graphite Immediately Transmits Heat)
A Small Bowl With Distilled Water Placed Near Your Torch (To Cool Hot Tools With)
A Stainless Steel Pot Of Water (For Hot Reject Work)
Other Optional Tools: Graphite Bead Roller(s) and Brass Bead Press(s)
And Last But Not Least, A Variety Of Devardi Glass Rods & Stringer
I have created a list of some of my favorites and they are on the next page.
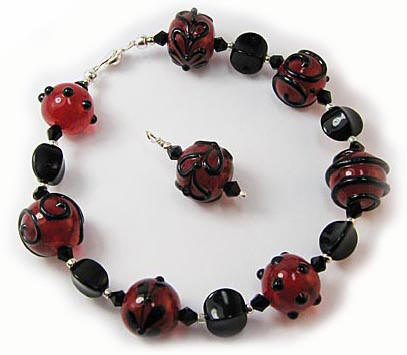
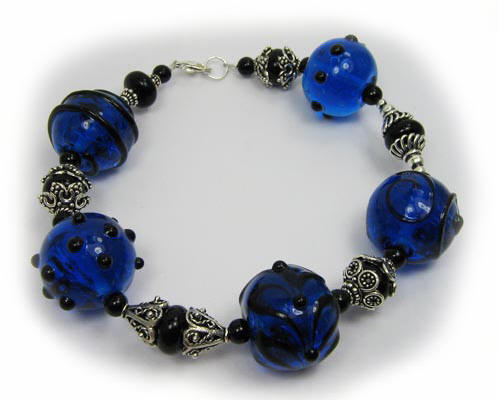
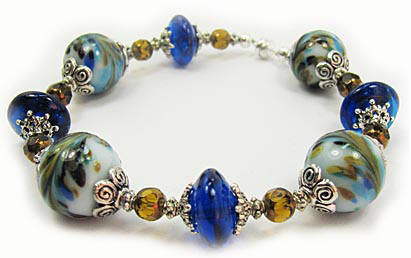
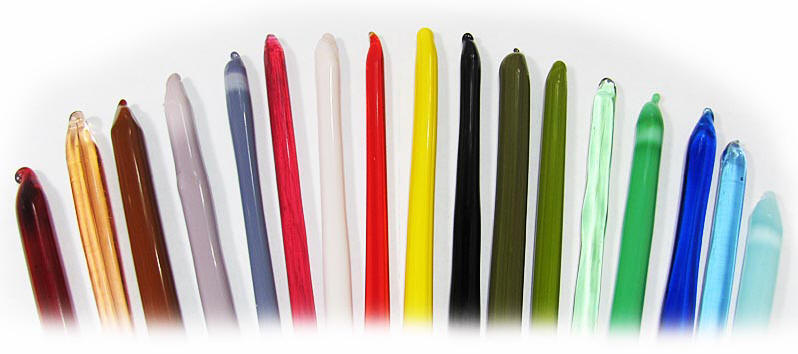
SOME OF MY FAVORITE DEVARDI GLASS COLORS BY TYPE…
This list is sorted by glass type. Opaque glass produces a solid color. Semi Opaque glass
colors can have a hazy or less opaque appearance, but on the Hothead Torch they can
also turn opaque, especially after annealing. Transparent colors produce the same
clear color as the rod. This is by no means a thorough list, they are just colors that I know
and like to work with to get you thinking of colors you would like in your collection.
The rods in these pictures present a visual sample by glass type. The actual glass lists are
colors that I have tested and worked with on the Hothead Torch and like. Devardi offers
so many colors that one could collect and test them as a profession! I encourage you to
always test your colors alone and together before making up a complete set of beads.
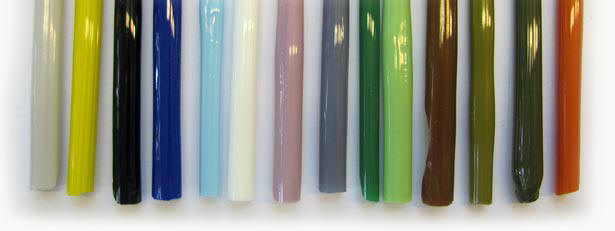
OPAQUE COLORS
D108 Opaque Lemon Yellow
D120 Opaque Army Green D146 Opaque Violet Blue
D123 Opaque Frog Green D147 Opaque Deep Lapis
D125 Opaque Dark Marine Green D149 Opaque Teal
D128 Opaque Light Lilac D159 Opaque Burgundy
D130 Opaque Lilac D162 Opaque Light Gray
D141 Opaque Light Blue D165 Opaque High Density Black
Opaque Indian Marbled Butterscotch
NCN Opaque Dark and Medium Brown (and other Browns)
SEMI-OPAQUE COLORS
Semi Opaque White
NCN Misty, Midnight Misty and Lt. Green Misty
D73 Semi Opaque Light Pink Plum
D74 Semi Opaque Plum
D83 Semi Opaque Moonstone White
D87 Semi Opaque Light Peach
D38 Semi Opaque Dark Baby Blue
D109 Semi Opaque Light Baby Blue
D113 Semi Opaque Tropical Green
D113a Semi-Opaque Dark Tropical Green
D123 Semi Opaque Light Jade Green
D144 Semi Opaque Violet Blue
Semi Opaque Dark Marine Green
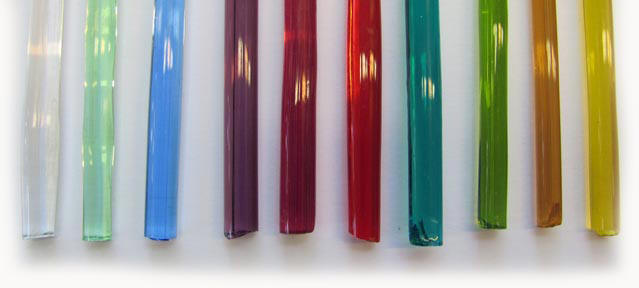
TRANSPARENT COLORS
D7 Transparent Dark Rose
D11 Transparent Cranberry
D13 Transparent Medium Ameythyst
D23 Transparaent Marine Blue
D33 Transparent Light Green
D51 Transparent Ice Blue
D66b Transparent Dark Violet
SOME BASIC TIPS…
I'm going to ramble for a bit and cover as many topics as I can think of. Please consider
coming back and reading this again after you have started lampworking. See what you
missed and what is of use to you then, and it will likely be different. At the end of this
Overview is a section titled 'A Quick Overview'. It covers information on mandrels and
Bead Release, making a bead and cooling or annealing it, and then how to remove it
from the mandrel. It is meant to be a quick reference but should be used with the
Tutorials and videos on the Devardi website.
So here we go with some rambling by topic.
Glass Has No Memory And Is In No Hurry… Someone once said that glass has no
memory - you can work and re-work it to your hearts delight in most cases (unless it is a
particular glass that is prone to devit). Sometimes as we work WE start getting stressed,
and then we need to remind ourselves that glass isn't on a timetable and it isn't going
anywhere, in fact it's in no hurry at all unless you overheat it and make it 'run' if you
pardon the pun. This can be a big help to remember.
When you feel yourself getting stressed and hurried just stop, continue to patiently roll the
bead higher up in the flame to keep it warm and take a few breaths… then start in
again. You can continually settle yourself and advance your work and skills by doing
this. Rolling your work 'higher up in the flame' means holding it 6 to 8 inches away from
the torch-head in the flame. This distance will keep it hot but not melt in details unless
your torch is set to high.
I will discuss this later under the Hothead Torch section, but your torch flame should be
set as low as it can be without going out for your normal working flame when using
Devardi Glass. Then you would do most of your work 3 to 4 inches from the torch-head.
You should be able to hold your palms and work with your finger tips 2 to 3 inches away
from the sides of the flame when it is set at this level. You can turn your flame up to heat
some glass faster, or to melt in things if the glass can handle it, but then you should turn it
back down to this basic working flame.
In hot weather your torch will stay on easier at a low flame than in winter. This is because
gas expands. In winter some people actually put a heating pad on their propane tank
outside if it gets very cold and they have trouble with the flame repeatedly going out.
Others put a Regulator on the tank to stabilize the gas flow. Your geographical location
and your set-up will affect your torch performance in winter.
On Your Work Surface… Torches get hot and glass turns molten, so you need a fire proof
work surface for safety. You can use a variety of materials, but my preference is the
large, inexpensive Paver Tiles you get from a Home Improvement Store. You can use
them as a work surface and as a wall surround to your workarea.
For examples of why you need such protection consider these two possibilities.
Sometimes when you are introducing a cold rod into the flame it will shock and send a
piece of hot glass (also called a shard) flying. Hopefully you are holding your rod with
the end pointed directly away from you like you should, so that the hot shard goes
forward. That is why you need a fireproof surround on around your work surface. You
don't want that shard landing where is could burn something or start a fire. Another
concern is that if you are new to glass work you may let your rod get soupy hot and it
may drip, and so a fireproof surface protects your work table and your lap.
About Ventilation… If you are using a Torch indoors you must have adequate ventilation
(notice I used the word MUST). This means that your exhaust or ventilation fan creates
enough draw to clear the room of fumes and draw fresh air in at the same rate. You
should have a source of fresh air behind you that is at least the same size as your exhaust
duct, so that clean fresh air flows past you into the ventilation system at the same rate.
There are many articles and information on this on the Lampwork, etc. Website if you
care to research it there.
If you do not have adequate ventilation you can poison yourself. Toxic fumes are
nothing to play around with so be sure you have adequate ventilation before you start
working on your torch, or set up outside until you do have a good ventilation system.
The Hothead Torch… The Hothead Torch or it's generic equivalent is truly a wonderful
invention. It allows us to work glass for a very reasonable price - simply the cost of
propane (or the gas we use). There are many who feel one must have a mixed torch in
lampwork, but that is not so. Almost anything can be done on the Hothead Torch, and
it's bushy flame is a big help to new lampworkers and glass sculptors.
When needed, you can turn it up higher to melt glass quickly, but to do general work
and detail work on the Hothead Torch you need to set the flame at the lowest setting it
can have without going out. That is your basic working flame. You should be able to
hold your palms or work with your fingers 2-3'' from the sides of flame if it is set low
enough. The usual working area (or Sweet Spot, as some people call it) is about 4'' from
the end of the Torch Head. People usually have the tendency to move in to close to the
Torch head. Watch for this and try not to do it. Closer than 3'' from the Torch Head is a
propane-rich section of the flame and can dirty your glass and make it change color.
For detail work with stringers, preheat your bead surface and then hold your bead to the
side of the flame, right where your stringer just starts to relax or 'gives', or does what you
want for your detail work, and then move back into the flame when you need to flamecut
your stringer or rod.
When you are switching to some new task on a bead (like adding another color or
picking up or putting something down) continue to roll it higher in the flame (6 to 8
inches above the Torch head) as you get what you need with your other hand. You can
keep your work warm this way and take as long as you like. Yes, you read that right,
there is no hurry and no need for the anxious feeling that you must get back to the bead
immediately. Keep turning it in the higher flame and take your time getting what you
need for your next step, or putting things away when you finish a step.
When you are ready to turn your torch off it will benefit you to bleed out all of the gas
first. I turn the gas off at my propane tank, and then sit in front of the torch and steadily
turn it higher until it goes out. Then I hold a lit Bic Lighter under the torch-end to burn the
rest of the gas that continues to come out. Finally it will flare up once before it is done.
Then I know I have the vast majority of the gas out of the line. That way leftover gas in
the line doesn't separate and cause gunk to form. If you don't bleed out your line this
gunk will collect in your hose and eventually will spit out on your work at some point.
To clear out your hose I am told that you can unhook the hose and hang it over a trash
can with a liner in it, and let it drain over night. Because I burn out my gas every time I
have never had to drain a hose (so far).
How Hot It Is… New lampworkers tend to be anxious about the flame. If you are new to
the world of lampworking I would encourage you to get aquainted with your flame and
work at getting free from what I call 'Flame Anxiety'.
If you know you are anxious about your flame, turn the Torch on low and sit with it. Just
sitting with your torch with the flame going (on low) may cause stress at first. See if this is
true for you. For some reason many new lampworkers feel an anxious need to be busy if
the flame is going… it causes stress and haste and makes for a slower learning curve.
You need to see that the flame is like water running in your sink. It can be wasteful, but it
is simply a tool in use. It is neutral. Sit there and do this or that while your flame is going,
and get used to being around it. Respect it's range of danger, beware of your hair and
hands and clothing. Beware of reaching forward to get something and leaning your
face to far toward the flame. Develop a sense of where the flame is at all times and
learn to live with it as you work. If you putter around while your flame is on you will start
learning this safe range and way of moving and reaching. It's easier to learn this way
than learning as you actually are working, and making mistakes with work in progress.
Next hold your palms open and alongside the flame and see how close they can
comfortably be. Then do the same with the tips of your fingers. They shouldn't get hot
and you should be able to hold them 2 to 3 inches from the sides of the flame. Let
yourself play with glass rods or Stringer just to see where they start to bend or give in and
near your flame. The Torch is your greatest tool and toy in this exciting new adventure.
Don't make it all about production and having to 'make something'… give yourself the
gift of play and learning things out of curiosity and interest. Have fun!
Your Habits As You Work… I want to encourage you to have a particular place that you
set each tool on your work surace. Have a rack for your glass rods and Stringers and so
on. Make it a point to return each thing to where it goes on your work surface every
time. Once you develop the habit of doing this you will always be able to put your hand
to what you need, and you will not be burning or sticking yourself accidentally. You
won't have to try to remember where a thing is because your mind subconsciously
knows, and your hand will head toward that spot. It will make all the difference in your
ease of working as time goes on.
After using a rod or stringer in the flame, always set it down on a rack that is the farthest
forward of your items on your worksurface, with the hot end facing away from you. That
way you always know which end is hot and you can't bump into a hot end while
reaching for something near it.
Clean Dirty Glass… Get in the habit of cleaning your glass before use. You can use
Alcohol and a cloth or some other cleaner. People who are very serious about it use a
Dip or hot Pickling Solution, but for our level of work just cleaning the glass is a good start.
When I get new rods I wash them in a two-step process, first in hot water with liquid Dish
Soap, and then I rinse them and spray them with Window Cleaner, and then rinse again.
Then I dry them on a paper towel. They come out nice and clean that way. To clean
my Stringers I dip what I need in a bottle of Alcohol and wipe with old T-shirt material
before I start. Whatever method appeals to you, do clean your glass. Wiping off the
grime and oil from your glass's past life is important. That grime will transfer to your work.
Keep Your Rod Ends Neat… As you finish using a rod of glass or a stringer, take a second
and roll the end on a marver while it's still soft and before putting it down to cool. It will
be ready to work with the next time and the end will be neat when you put it away.
A BRIEF TALK ABOUT DEVARDI GLASS…
Devardi offers a huge array of colors at fabulous prices. You get intense, color saturated
glass, but realize that it is hand-pulled. The hand-pulling means that rods will come in
many thicknesses, some too thick to use directly on your mandrel. When you want to work
with a very thick rod you will first need to pull thick stringer to use, so thoroughly preheat
the end of it in your Rod Warmer. Then use pliers to pinch the end into a cone shape
and then pull it into thick stringers to use like a thin rod. Your first free Tutorial exercise
after learning to dip mandrels is how to pull stringer. It’s not that hard once you get the
knack of it, and it will introduce you to the flame and how quickly glass melts or cools.
Some Devardi glass colors must be worked VERY cool in the flame or they get stiff and
start to devitrify. Because of this I have listed the colors of glass that you should use in
your exercises or Tutorials. Learning on ‘friendly’ glass is very important. Learning to work
the challenging colors can come later. Devardi glass offers a terrific price and savings,
but it has it’s own requirements for workability, as does every type of glass. Devardi glass
is very heat sensitive, so as a beginner, if you don’t have a Rod Warmer I urge you to
work with Stringers until you get a Rod Warmer.
The last thing I will mention is that some colors will hold their coiled-on shape on the
mandrel no matter how long you heat them in the flame. Therefore, if you just continue
to heat them without shaping manually you will bring the glass to a state of devit, and
then to blistering in the flame. This aspect of the more sensitive Devardi glass colors
makes using a Brass or Stainless Steel shaping tool and a Graphite Bead Roller an
important part of working with these more delicate glass types. Other brands of glass
also have this same aspect when being worked on the Hothead Torch or it's generic
equivalent, like Effetre Anice White, and CIM Orange Dreamsicle.
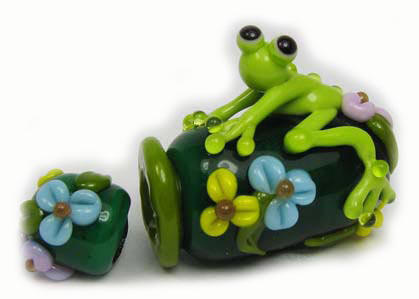
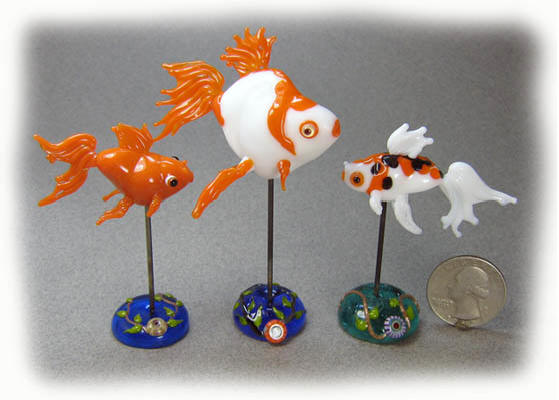
Devardi’s stiffness in the flame also makes for very promising sculptural use, but that’s a
Tutorial for another day… these Goldfish were made with a Semi Opaque White base.
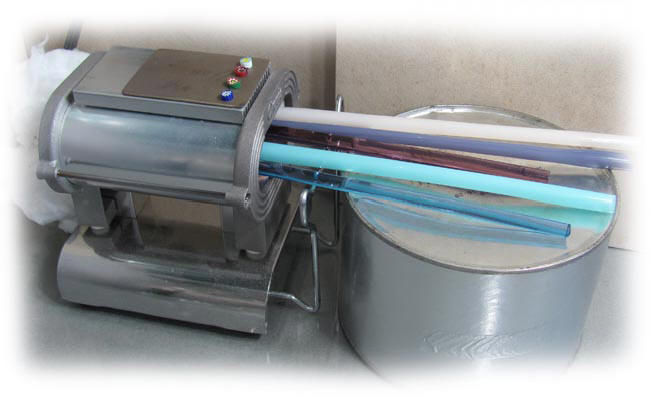
THE IMPORTANCE OF A ROD WARMER…
Using a Rod Warmer to preheat Devardi glass rods makes all the difference in the world
in preparing them for the flame, so if you don’t have one I STRONGLY encourage you to
get a Rod Warmer. They are not that expensive and they are available from Devardi or
can be purchased online from Beauty Supply sites (they are called Ceramic Heater
Stoves).
A Rod Warmer reaches 800-900 degrees, so you will rarely ever experience shock or
shattering if you use one. Some people use a small Teflon coated Grill or Hotplate
successfully by spending the extra time to make sure the rod is heated slowly in the flame
at the start, but these don’t come near the temperature of a Rod Warmer.
You can take the time to wave and roll your cold rod in the high, back-end of the flame
to warm it, and then ever-so-slowly bring it forward, rolling and heating it until you can
bring it into the actual working area of the flame, but most people don’t have the time
or the patience to do this successfully on each rod. And it’s really not cost effective to
spend your time this way either. Even after doing this some people still experience shock
or shattering, despite their best efforts to adequately pre-warm rods.
As you can see in the picture of my workarea, I use a medium-sized nut can (from
Walmart) turned upside down to rest the ends of the rods on. It is just the right height
and width. The Rod Warmer gets very hot, so I wrap a piece of Fiber Blanket around the
cord at the back to act as a heat shield between the Rod Warmer and the cord
because I have the Rod Warmer in the back corner of my worktable and this traps heat
there because the Ceramic Tile is behind it.
Devardi offers an inexpensive steel plate for the inside bottom of the Rod Warmer. It will
protect the bottom from glass rods that get put back in the Rod Warmer to hot. They
can stick to the ceramic bottom and sides if you touch them together in a molten state,
so be sure to roll your rod and cool it before returning it to the Rod Warmer. The top of
the Rod Warmer makes a great surface to preheat Murrini on before applying them. I
have the Murrini sitting on a small piece of steel plate, also available from Devardi.
To work Devardi glass with the greatest ease and productivity… put your rods in the Rod
Warmer about 2” deep. You only want to preheat the rod end, so that you can hold it
normally and work it in the flame. When you first turn on your Rod Warmer plan to
preheat your rod(s) for 5 to 10 minutes before you use them. Then, after each use, roll
the tip of the rod on your marver to shape and cool it before you return it to the Rod
Warmer. A glowing rod end will stick to the Rod Warmer and to other rods. Keep
returning the rod to the Rod Warmer so that it is ready for the next use. Cool rods can be
put into a hot Rod Warmer without shock and used when they are fully warmed (about 5
minutes on average).
Please print the Tutorials on the Devardi website on pulling stringer, and making a round
bead using stringer or a rod with and without a Graphite Bead Roller. You should
practice with these Tutorials until you can make round beads consistently, and then
enjoy learning to shape or decorate in different ways.
You can also combine Devardi Glass with effetre and other COE 104 glasses, just test
your combinations before making a finished project or set to be sure they play nice
together. This is especially important if you will be encasing your work.
You can feel free to copy any of the items shown in these Tutorials or Overviews. They
are here as examples and can be made and used for yourself or to sell.
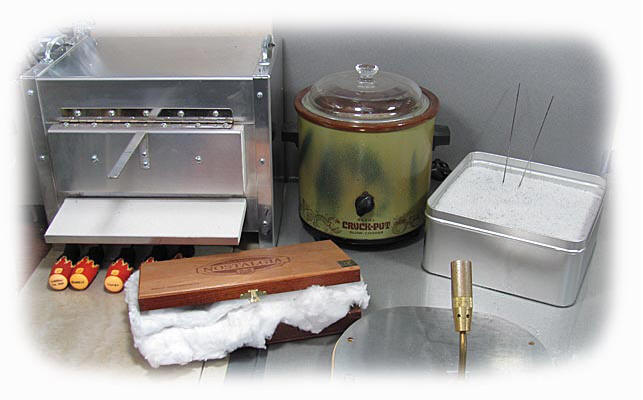
BEAD COOLING OPTIONS…
If you do not have a bead-annealing kiln to put your work in after you finish it, then
you probably use either Fiber Blanket or a crockpot full of Vermiculite. You might
also use what are called Japanese Annealing Bubbles.
I have used each one of them, and for the size beads I tend to make I have found
that the Annealing Bubbles were more effective at slowly cooling my beads. I used
to wrap my crockpot in a fleece blanket while set on high to let my larger beads
cool slowly, and then turn it off after a few hours. That is definitely not
recommended and can cause your crockpot to overheat - as you can see by the
faded paint on the crockpot in the picture above!
Each of these methods of cooling are risky and inadequate for all but smaller
beads, when it comes right down to it. If you continue in lampworking you need an
Annealing Kiln.
Devardi offers a Rod-Warmer sized Mini-Annealer. It would be the least expensive
option to anneal and cool beads. Another option you might like to know about is
The Glass Hive. They allow you to put a kiln on layaway and take as long as you like
to pay it off, and that is what I did. You can see their ‘Short Guy’ kiln in the picture
above. It’s a great little kiln. The Glass Hive is online at www.theglasshive.com if this
interests you. They frequently have sales where they reduce the price or pay for the
shipping, and they pre-program the kiln for you.
To locate Annealing Bubbles, do a search for ‘Annealing Bubbles’ online and find
the best price for them in the large Tin. They need to be in metal to work best and
the larger Tin lets you put many beads in it during a work session at the torch. The
supplier I got them from is www.artcoinc.com