|
A BRANCH OF MAILBUGGY GENERAL STORE |
|
|
|
| Download this tutorial for printing. |
.•:*:•.
The Devardi Glass Tutorial Series .•:*:•.by
Fine Folly Glassworks
How To Make Easy Multi-Layered
.•:*:•.
Rose Petals.•:*:•.
PART ONE
.•:*:•.
INTRODUCTION.•:*:•.Most layered Rose or Flower beads are created by putting a complete layer of
encasing around the bead between each layer of petals. For most of us that’s a
challenge and produces a very thick bead.
This tutorial will show you how to make a layered-petal flower bead using dots of Clear
instead of spreading layers of encasing between each layer of petals. It’s an easier
method and the number of clear dots (and therefore the depth of each petal) is up to
you.
Be sure to use a contrasting color for your core. For example, if you use dark petal
colors use a lighter core, and vice versa. You want your petal work to stand out, so
using distinct colors will help your petals and shading stand out.
I am using a Hothead Torch to make this bead but you can use any torch. If you use a
mixed torch be sure to work this bead cool so that you don’t smear your work or shift it.
|
|
|
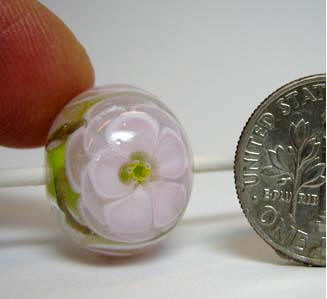
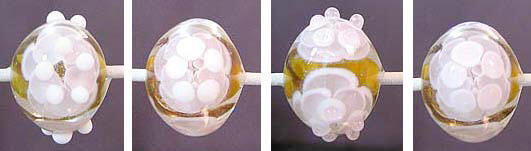
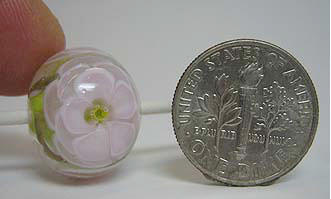
.•:*:•.Petal Layering Options – Staggered or On Top Of Each Other.•:*:•.
The bead on the left has the first two bottom layers of petals placed right on top of
each other. The bead on the right with the dime has each layer of petals staggered
over the previous layer. You get a slightly different look if you stack or stagger, and I
thought you would find it interesting to see the difference.
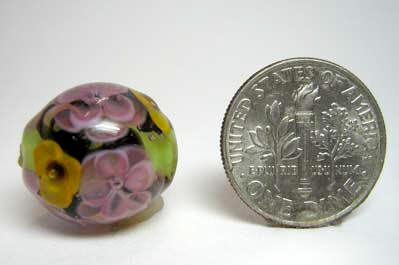
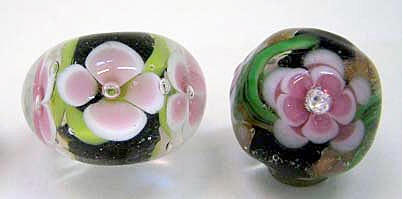
The bead below has bubble centers. The deep yellow flower had 3 single-layer petals
and a transparent burgundy dot in the center before the bubble was created. You can
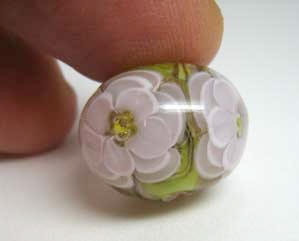
see that the pink flower had two layers of staggered petals. This soft pink rose bead
above has 3 layers of petals.
.•:*:•.
WHAT YOU NEED TO BEGIN.•:*:•.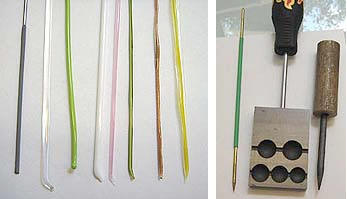
I used the glass listed below and the tools shown above to make this pale pink bead.
You will need to make the following Stringers to work with. There is a free Tutorial on
pulling Stringer on the Forum website if you need help with this skill.
Mandrel dipped in bead release
Tools to work glass with
(I used a Pointed Brass Poker, a round Graphite Bead Rollerand a sharpened and then dulled Graphite Rod in a holder)
Rod of CIM or effetre Clear
Stringer or Rod of Bead Core Color (I used Pea Green)
Encased Goldstone Stringer
(this Stringer is Devardi Goldstone/Aventurine encasedin Clear and then pulled into a Stringer)
Stringer of Flower Petal Base Color (effetre Light Pink or Bubble Gum Pink)
Stringer of Transparent Petal Accent Color (optional – effetre Opalino Pink/Rose)
Stringer of Center Stamen (or instead create a poked Bubble or set in a CZ)
.•:*:•.About Making A Stamen Stringer.•:*:•.
There are free videos and instruction on the Internet showing how to make Stamen
Stringer, but here is a brief explanation.
A simple Stamen Stringer can be made with a rod of Clear and an opaque yellow
Stringer. Gently preheat the rod of Clear and draw thin stripes down the sides of the
Clear Rod 1 to 2 inches long. Make 3 to 5 stripes and be sure to use an opaque dark
yellow/gold for the Stringer.
When you have your thin stripes drawn on the Clear Rod, roll and heat them gently
to seat the stripes on the clear rod. Then pull the Clear rod into a Stringer thickness.
The Stamen Stringer in the picture on the far right was made this way. It does not
have to end up round and smooth.
For best results you should pull the end of the Stamen Stringer to a tip before pressing
it into the center of the flower (for each flower). This will draw the petals down into
the center with the tip, instead of just punching a round hold through the petals.
You can see this stretching effect best in the flower petals on the left in the picture
below. The flower has only one layer of white and then a layer of transparent rose
but it shows the stretched in effect. It was poked with a cone-shaped Brass Poker
tool to draw the petals down with it. Brass drags glass, while Graphite slides over it.
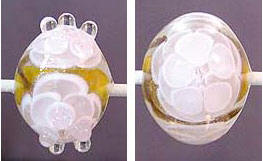
.•:*:•.Other Flower Center Options.•:*:•.

A PRETTY BUBBLE: The bead on the left above shows a Bubble Center. Your flower
can have a bubble in the center instead of a Stamen. To do this you heat the center
of the flower and use a pointed tool to press in the center. Then apply a tiny dot of
clear to cover the hole you just made. Gently level it with a tool and melt it flat, and
it will produce the bubble in the center. Use a cone-shaped tool to make your hole
so that your petals are drawn down toward the center, otherwise you will just punch
a barrel shaped hole through the center of your petals.
A SPARKLY CUBIC ZIRCONIUM CENTER: Also referred to as a CZ. The bead on the right
has a CZ for a center. To do this you slightly indent the center of your flower using a
tool and then apply a CZ (that you previously used a Glue Stick to apply to the end
of a small mandrel). You can cover the CZ with a small dot of clear, or if it is seated
in well you can leave the top bare.
There are videos on the Internet showing how to seat CZ’s on your bead. It takes
practice but is very pretty, so it might be worth it to you to learn to do it. You need
uncoated, cone-back shaped CZ’s.
.•:*:•.
OKAY LET’S GET STARTED!.•:*:•.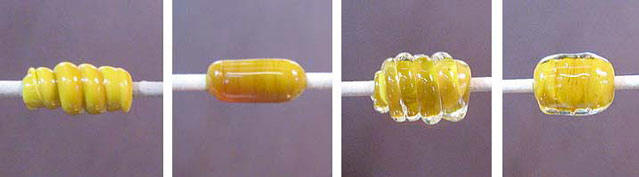
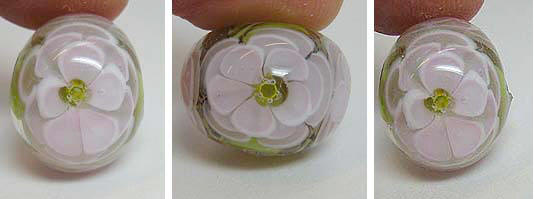
1. Wrap your core color one stringer-wrap around. Smooth it out and let it cool a bit (second
picture). If you don't let it cool before wrapping with the clear stringer it may merge into the
Clear. Wrap your slightly cooled core with a Clear Stringer. Slightly over-wrap with the clear so
that clear goes around the mandrel on both sides. You are encapsulating your core color. You
don't want your core color to come up through the Clear at the sides or in the middle (see third
picture). Melt the Clear smooth and let it cool a bit.
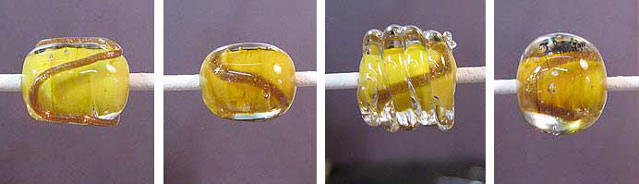
2. Draw a wavy line with your Goldstone Stringer next. Melt it in, cool slightly and then wrap with
a Clear Stringer (third picture). Make your Clear wrap a barrel shape because it will give you
the right amount of glass as your bead rounds into a ball. Melt the Clear into a round shape
and let it cool a bit. It’s good if your bead is a wide at this point, because as you add petals
and dots it will get taller or thicker. Starting with a wider bead helps it hold to a round shape in
the end. You can use a Graphite Bead Roller for nicely rounded ends by using a larger cavity in
the Roller.
To get your bead to come to a round shape manually, heat it to a glow and then take it out of
the flame and keep turning it. As it starts to cool it wants to pull into a round shape. You can
repeat this process to bring it round, or use your Graphite Roller. You want a nice shape at this
point because your dots will melt across this shape and continue it.
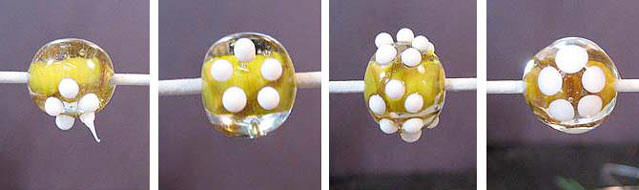
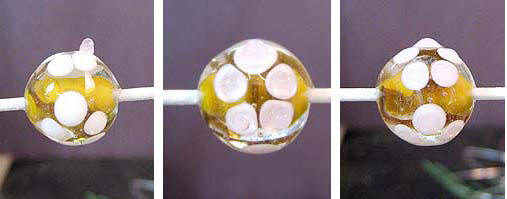
3. Using your Base Petal Color Stringer and make 3 or 4 or 5 small dots, depending on the flower
shape you want (second picture). The size of “O” around and tall is a good size. Dots really
spread and keep on spreading with each layer you add. Place your dots about ½ “O” size
apart around the imaginary circle of the flower space. If you place them to close they will
merge. If you have trouble with dots merging, place them 1 “O” size apart.
The first picture shows a stretched tiny amount of glass being added to that dot to make it the
same size as the other four dots. Take time to add teeny bits more to make all the dots on the
flower circle the same size. Melt in your dots completely (fourth picture). Allow the bead to
cool slightly.
4. Place dots of the transparent color (for the shading) in the same size "O" or a touch smaller in
the middle or to the center of the flat white dots. Take the time to adjust your dots to be the
same size so they spread the same.
If you want solid colored petals don’t add the transparent dot layers. Just do solid color dots
and clear dots between.
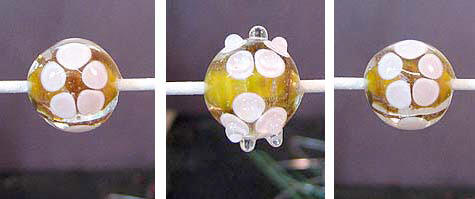
5. Melt in your transparent dots completely (first picture). Keep melting to shape the bead as
round as possible. Let it cool a bit and then apply Clear dots like you did the transparent dots.
Melt in completely (third picture). Make the clear dots at least as large as your initial dots.
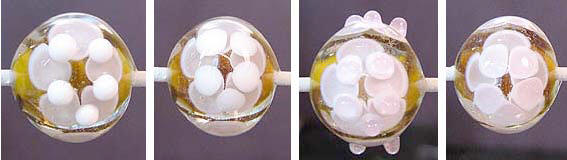
6. Place your second ring of base-color dots on the divides/edges between the petals about in
the middle of the petals or just a bit toward the center (first picture). Repeat the process of
melting in and then placing your transparent dots and your Clear dots.
PROBLEM NOTES: In the top picture on the left you can see that the very top (melted-in) dot is
bigger than the other four melted in dots. This is because the dots were bigger on this petal
than the other four so it spread more. Beware of this or you'll have mixed sized petals. You may
like this uneven effect, but I wanted to mention it in case you wonder what happened.
In the bottom right picture you can see the right edge of the mandrel has a tiny spike area. A
small amount of clear can be run around the bead, not touching the mandrel, and then
carefully melted and pressed toward the mandrel (with a small brass or graphite tool) to fix this.
Don’t leave a spike or your bead will have an uneven point on the side hole.
7. Repeat the steps for your third layer of petals, including the Clear dots. Round the
bead with more heating (half in and half out of the flame).
Do you notice how the bead is getting tall/oval with all the layers of dots? That’s why it
is good to have a wider round shape when you start. And you can see the sharp point
on the mandrel on the right side (that I didn’t notice as I made this bead) in the bottom
picture on the left. Be sure to look for it and fix it early!
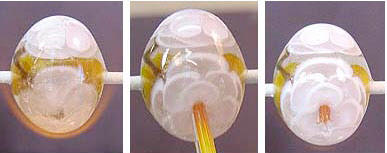
8. After rounding the bead let it cool a bit and then if you are doing the Stamen Stringer
centers do the following. By the way, I hold my bead/mandrel in my left hand as I work,
so when I need to pull a Stringer to a point I also hold the Stringer in my left hand, but to
the front of the bead mandrel as I pull it with my right hand and pliers.
a. So, gently heat the tip of your Stamen Stringer and pull it into a point - to a small point
shaped like a sharpened pencil. This is so that when you push it into your flower center it
doesn’t punch through your petals and make a round hole in them, but instead it
pushes them down and in with the stamen stringer stretching them. That way it appears
that a Stamen coming out of the center. Take the time to pull and re-point your Stamen
Stringer for each flower center.
b. (First top left picture above) Heat one flower to a glow. Move it out of the flame a bit
and take your pointed stamen stringer - carefully center it and gently press it in toward
the mandrel.
Take the bead out of the flame and blow on it gently until the stringer easily snaps off.
Return the bead to the flame and roll the bead to reheat it just a bit. Repeat this cycle
for each flower until all of them have a Stamen center.
c. Next apply a tiny dot of clear on top of the Stamen spot IF the break is below the
surface of the bead, which it almost always is. You can pull your Clear stringer to a
point to be able to place it inside the center on the Stamen indent so you don’t create
a bubble. If you put to big of a Clear dot on, gently pinch/pull off the excess Clear with
tweezers. You want a tiny dot of Clear to fill the center indent hole, not one that over
spreads your petals (see the two pictures on the bottom left).
After all of your flowers have Stamen inserted and a tiny dot of Clear on top of the
Stamen, gently smooth/melt in the dots. Keep half your bead half way out of the flame
as you turn so that you are heating the surface of the bead, not the core. You do not
want to overheat and shift the inside of the bead or make your petals slide or elongate.
9. You are done at this point unless want a layer of clear on the outside of your bead to
magnify your flowers. If you do, then let the bead cool in the higher back part of the
flame and heat your Clear rod soupy hot to apply your final encasing layer. Scoot the
layer with a tool to where it needs to be and then gently melt it in so that you don’t
overheat and cause shifting or smearing.
Remember that if you don't allow your bead to cool before applying the encasing
layer, your design can smear or shift with the melting in of the encasing layer. Be sure to
keep your bead half in and half out of the flame as you melt in your encasing layer or
you can still overheat your inner bead and cause it to shift.
10. When you are all done working the bead, place it in the Annealing Kiln. If you do
not have a kiln the next best choice is Annealing Bubbles (which don’t really anneal but
allow the bead to cool more slowly than Vermiculite or Fiber Blanket).
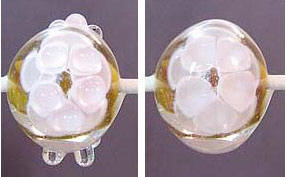
.•:*:•. Different Center Options .•:*:•.
To create a Bubble Center you can use a pointed Poker tool (Brass works best). After
heating the center, deeply press it in and then go back and apply a small dot of clear
over the hole to seal it. After you smooth/melt in the Clear dot you will have an air
bubble in the center of the flower, which is a pretty look (see the bead on the left).
You can also apply a CZ in the center of your flower for another center treatment (see
the bead on the right). Applying CZ’s well takes practice.
Use a clean blunt mandrel and a dot of glue from a Glue Stick to hold the CZ on the
end of the Mandrel - with the point of the CZ sticking up, because the point goes into
the center of the flower.
When it’s time to apply it, heat the center and gently poke in a shallow cone-shape into
the flower center to make it ready to receive the CZ. Then gently reheat the center and
set the CZ into it. Apply a dot of Clear and carefully smooth it, or if it is seated well
already with a slight rim of glass around it’s edge you can leave it uncovered.
If you like the idea of using CZ’s you should research different techniques to applying
them. They can really enhance work, but need to be applied well or they shift or turn at
an angle.
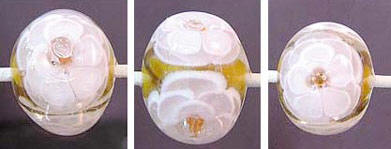
.•:*:•. Examples Of Problems.•:*:•.
1. The bead on the left has uneven sized petals. You can see that the bottom petals
elongated more. Pay attention to uniform dot size to prevent this. The other issue with
this bead is that the Stamen Stringer was pressed in to high and it missed connecting
with the bottom petals.
2. The center bead has a barrel -shaped hole through the center. This can happen
when you don't pull your Stamen Stringer into a point, or when you punch through your
petals (instead of steadily pressing them into the center) with the Stamen Stringer.
3. The far right bead has a sharp edge on the right side. This comes from wrapping the
glass unevenly around the mandrel when you first begin.
In closing, if you like this petal-making method, plan to make this bead a number of
times with different glass combinations. Practice and good color combos make this a
special bead!
.•:*:•. One Final Note For Beginning Dot Makers .•:*:•.
This bead is challenging when you are first learning dot control. If you just can’t seem to
make this bead at present, practice your dot control – and practice learning to place
dots where you want them and in the size you want them. It will get easier with
practice.
Pay attention to how the glass stretches when you add more glass to a dot, and how
long to take to lift off your Stringer to get a consistent size of dot. You could say it’s
almost like a dance step, there's a rhythm to it for consistently sized dots that are well
placed.
As you are working with dots remember that you can use a flat-edged tool to scoot or
reshape a dot that is not where it should be… try different things and you will succeed.
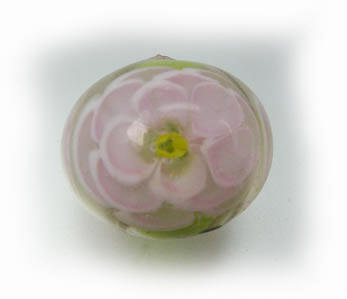
The bead above is one of my failures, but with perseverance I learned this technique
and now it is a Tutorial. I hope it’s useful to you.